


New to quilting? Check out our beginner quilting class covering all the basics.
How to Sew the Hourglass Quilt Block
The Hourglass block is made using the Quarter Square Triangle (QST) method. It produces four triangles arranged into a square that creates a beautiful hourglass design.
Step 1: Draw the Diagonal Line
On the back of the lightest square, draw a pencil line at 90° to the existing seam on the diagonal.

Step 2: Butt the Central Seams
Nest the central seams together so they butt up against each other for a precise match.

Step 3: Sew Both Sides of the Line
Sew a ¼" seam allowance on both the right and left sides of the diagonal line.

Step 4: Cut Along the Pencil Line
Cut along the pencil line to separate the two hourglass blocks.

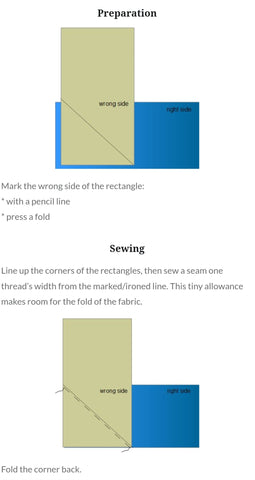
Covered Corners Technique
The covered corners technique is a great way to add triangle details to your blocks without complex piecing. Follow the steps below:


How to Resize Quilt Blocks
The first step in modifying any quilt block is to decide on your finished block size. You can base this on doubling a pattern, cutting it in half, or working with your available fabric.
Note: When working from a pattern's cutting instructions, remove the seam allowance before scaling. For example, if your pattern calls for 3½" squares, subtract the seam allowance (½"), double the finished size (3" → 6"), then add the seam allowance back (½") — giving you a 6½" cut piece.
Resizing Square Blocks
Add ½" to your finished block measurement. For a 4" finished square, cut a 4½" square of fabric.
Resizing Rectangular Blocks
Add ½" to both the length and width. To double a 3" × 4" block, cut a 6½" × 8½" rectangle.
Resizing Half-Square Triangle Blocks
Add 7/8" to the desired finished block size. For a 4" finished HST block, cut 4⅞" squares.
Resizing Quarter Square Triangle Blocks
Add 1¼" to the desired finished block size. For a 4" finished block, cut 5¼" squares.
0 comments