quilting quilt sewing patchwork quilts quilter fabric handmade sew quiltlife quiltlove quilters modernquilting quiltingfun modernquilt sewingproject patchworkquilt quiltingfabric quiltblock modernquilter quiltpattern quiltinglove ilovequilting

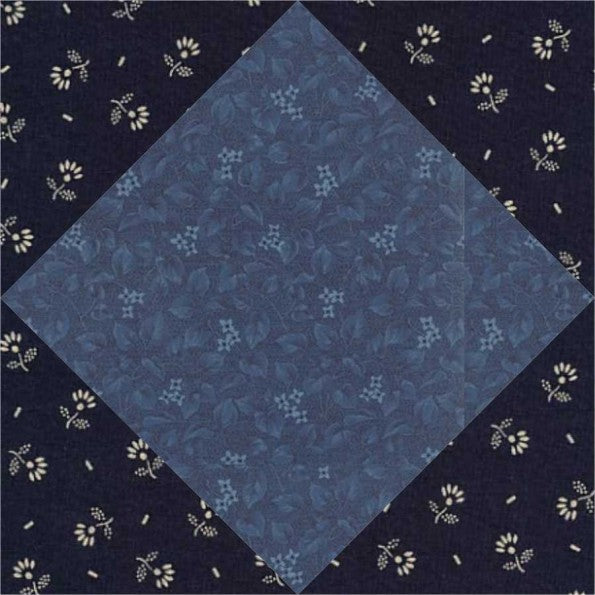
Square-in-a-Square Quilt Block Pattern

quilting quilt sewing patchwork quilts quilter fabric handmade sew quiltlife quiltlove quilters modernquilting quiltingfun modernquilt sewingproject patchworkquilt quiltingfabric quiltblock modernquilter quiltpattern quiltinglove ilovequilting

To keep these classes free please leave a donation for the teacher here. https://customclothingboutique.com/products/donat-to-motley-muse

 quilting quilt sewing patchwork quilts quilter fabric handmade sew quiltlife quiltlove quilters modernquilting quiltingfun modernquilt sewingproject patchworkquilt quiltingfabric quiltblock modernquilter quiltpattern quiltinglove ilovequilting

Click here for a beginner in depth sewing class on all the basics. https://customclothingboutique.com/pages/quilting-knowledge


Sewing a square-in-a-square quilt block can seem intimidating at first, but it's actually a straightforward process. Here are the steps to follow:

  1. Cut your fabric pieces to size: For a square-in-a-square block, you will need one large square for the center and four smaller squares for the corners. The size of these squares will depend on the finished size of your block. For example, if you want a 12-inch finished block, you could cut a 6-inch square for the center and four 3-inch squares for the corners.

  2. Mark the diagonal lines: Using a fabric pen or pencil, mark a diagonal line on the wrong side of each of the smaller squares, from corner to corner. This will be your sewing line.

  3. Place the first corner square: Place one of the corner squares right side up on one corner of the center square, aligning the edges. The marked diagonal line should run from the center of the corner square to the corner of the center square.

  4. Sew the first corner square: Sew along the marked diagonal line, starting and stopping a quarter inch away from the corners of the center square. Use a 1/4 inch seam allowance.

  5. Trim the first corner square: Trim the excess fabric from the corner square, leaving a 1/4 inch seam allowance. Press the corner square open, away from the center square.

  6. Repeat with the remaining corner squares: Repeat steps 3-5 with the remaining three corner squares, placing them on the remaining corners of the center square.

  7. Trim the block: Trim the block to the desired size, using the center square as a guide. Make sure all four sides are even and square.

And that's it! You have now sewn a square-in-a-square quilt block. Repeat these steps to make as many blocks as you need for your quilt.


How to Resize Quilt Blocks:

The first step in modifying any quilt block is to decide on the size of your finished quilt block. You can come to a decision based on a number of factors: doubling a pattern, cutting your pattern in half, or choosing the size based on your available fabric.
NOTE: When working from a pattern’s cutting instructions, make sure you remove the seam allowance before doubling or tripling the size. For instance, if your pattern calls for 3-1/2″ squares, first you’ll subtract the sum of the seam allowances (1/2″), double the finished block size (from 3″ to 6″), and add the seam allowance back in (1/2″). So, when all is said and done, you will cut a 6-1/2″ piece of fabric.
Resizing Square Blocks:
Square blocks are the easiest to resize. Simply add to your finished block measurement. For example, if you’d like your finished block to be a 4″ square, you’ll need to cut a 4-1/2″ square of fabric.
Resizing Rectangular Blocks:
Similarly to the square, for rectangle blocks, you’ll add to the length and width measurements of your finished block. If you’re doubling block that measures 3″ x 4″ in your quilt, you’ll cut a 6-1/2″ x 8-1/2″ rectangle of fabric.
Resizing Half-Square Triangle Blocks:
When you want to change the size of a Half-Square Triangle block, add 7/8″ to the desired finished block size. To make a 4″ finished block, you’d cut 4-7/8″ squares.
Resizing Quarter Square Triangle:
Since there are two cut lines and two seam lines in a Quarter-Square Triangle block you’ll need to add 1-1/4″ to the desired finished block size. For a finished block that’s 4″, you’d cut your squares 5-1/4″.
Back to blog

Leave a comment