


New to quilting? Check out our beginner quilting class covering all the basics.
Part 1: Half-Square Triangle (HST) Technique
This technique eliminates the need to directly manipulate the stretchy bias of the triangle. It uses two easy-to-cut squares and produces two HSTs at once.
Step 1: Draw the Diagonal Line
On the back of the lighter fabric, draw a pencil line diagonally from corner to corner.

Step 2: Sew Both Sides of the Line
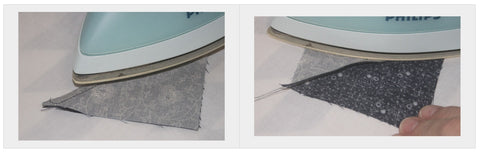
Stack a pair of light and dark squares right sides together. Sew a ¼" seam allowance on each side of the line.

You will end up with something like this:

Step 3: Cut Along the Diagonal Line

Step 4: Press the Seam
Press the seam together to set it, then press toward the darkest fabric.
Step 5: Trim to Size
Line up the 45° diagonal angle on your ruler with the seam, then carefully trim with a rotary cutter.


Part 2: Quarter Square Triangle (QST) Technique
Step 1: Draw the Second Diagonal Line
On the back of the lightest HST, draw a pencil line at 90° to the existing seam on the diagonal.

Step 2: Butt the Central Seams
Nest the central seams together so they butt up against each other for a precise match.

Step 3: Sew Both Sides of the Line
Sew a ¼" seam allowance on the right and left side of the diagonal line.

Step 4: Cut Along the Pencil Line

Part 3: Nine Patch Technique
The secret to a perfect nine patch is pressing seams so they butt together neatly when joined.
Method 1: Individual Squares
- Cut 5 A squares and 4 B squares in the required size.
- Using chain piecing, join a B square to 3 of the A squares, right sides together, with a ¼" seam allowance. No need to press just yet.
The result will be:

- Take the remaining A and B squares and, using chain piecing, join them to these units, right sides together, with a ¼" seam allowance.

Your result will be:

Method 2: Strip Piecing (Faster)
Cut A and B strips to the appropriate width and join them into A/B/A and B/A/B units. You will need twice the length of B/A/B strips. Sew right sides together with a ¼" seam allowance and press every seam toward the dark fabric. Cut across your pre-joined strips to create the units needed:


Press all seams toward the dark fabric so they butt up neatly. Join the B/A/B units to your A/B/A units with butted seams, right sides together, with a ¼" seam allowance. The direction of the final central seam is optional — press to facilitate butting the seam joints based on the block's placement in the larger quilt.
Wider Application
As long as a block has an underlying 3×3 grid, the nine patch principle applies. Keep pressing seams in pairs of opposite directions and piecing will be smooth sailing.

Sometimes it's not obvious which direction is “dark” with complicated blocks. Just remember the basic pressing plan:

How to Resize Quilt Blocks
The first step in modifying any quilt block is to decide on your finished block size. You can base this on doubling a pattern, cutting it in half, or working with your available fabric.
Note: When working from a pattern's cutting instructions, remove the seam allowance before scaling. For example, if your pattern calls for 3½″ squares, subtract the seam allowance (½″), double the finished size (3″ → 6″), then add the seam allowance back (½″) — giving you a 6½″ cut piece.
Resizing Square Blocks
Add ½″ to your finished block measurement. For a 4″ finished square, cut a 4½″ square of fabric.
Resizing Rectangular Blocks
Add ½″ to both the length and width. To double a 3″ × 4″ block, cut a 6½″ × 8½″ rectangle.
Resizing Half-Square Triangle Blocks
Add 7/8″ to the desired finished block size. For a 4″ finished HST block, cut 4⅞″ squares.
Resizing Quarter Square Triangle Blocks
Add 1¼″ to the desired finished block size. For a 4″ finished block, cut 5¼″ squares.
0 comments