


New to quilting? Check out our beginner quilting class covering all the basics.
How to Sew a Prairie Rose Quilt Block
The Prairie Rose quilt block is a beautiful floral design built from half-square triangles arranged into inner and outer petals around a center square.
Materials Needed
- Fabric of your choice (at least 2–3 coordinating colors)
- Sewing machine and thread
- Rotary cutter and cutting mat
- Quilting ruler
- Iron
Cutting Guide
- Four 5" squares for the block center
- Eight 2½" squares for the inner petals
- Eight 3" squares for the outer petals
- Four 2½" squares for the corners
Step-by-Step Instructions
- Take two 2½" inner petal squares and two 3" outer petal squares. Place them right sides together and draw a diagonal line from corner to corner.
- Sew a ¼" seam on both sides of the drawn line. Cut on the line to make two triangles. Press seams toward the darker fabric.
- Take one inner petal triangle and place it right sides together with one 5" center square. Sew a ¼" seam. Repeat with the remaining inner petal triangles and center squares, rotating so the petals alternate directions.
- Take two outer petal triangles and place them right sides together. Sew a ¼" seam on one side. Add two more outer petal triangles, rotating so petals alternate directions. Press seams toward the darker fabric.
- Sew the outer petal units to the center square and inner petal units, matching seams carefully.
- Sew the 2½" corner squares to the outer petals.
- Press the block and trim to 12½" square.
- Repeat to make as many Prairie Rose blocks as needed. Arrange in your desired layout, sew together, layer with batting and backing, quilt, and bind to finish.
Half-Square Triangle (HST) Technique
This technique eliminates the need to directly manipulate the stretchy bias of the triangle. It uses two easy-to-cut squares and produces two HSTs at once.
Step 1: Draw the Diagonal Line
On the back of the lighter fabric, draw a pencil line diagonally from corner to corner.

Step 2: Sew Both Sides of the Line
Stack a pair of light and dark squares right sides together. Sew a ¼" seam allowance on each side of the line.

You will end up with something like this:

Step 3: Cut, Press, and Trim

Press the seam to set it, then press toward the darkest fabric.
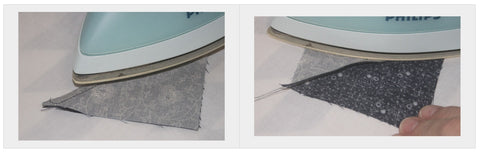
Line up the 45° diagonal angle on your ruler with the seam, then carefully trim with a rotary cutter.


Four Patch Technique
The secret to the perfect four patch is pressing seams so they butt together when joined.

Cut two A squares and two B squares. Using chain piecing, join one A square to one B square, right sides together, with a scant ¼" seam allowance. Press toward the dark fabric.

Press all seams toward the dark fabric so they butt up. Place the two A/B units right sides together, butting seams. Pin if needed, join with a scant ¼" seam allowance, then press.

You can apply this technique to all kinds of four patch blocks. As long as a block has a 4×4 grid, the basic principles apply. Keep pressing seams in pairs of opposite directions and piecing becomes easy.

Nine Patch Technique
The secret to a perfect nine patch is pressing seams so they butt together neatly when joined.
- Cut 5 A squares and 4 B squares. Using chain piecing, join a B square to 3 of the A squares, right sides together, with a ¼" seam allowance.

- Join the remaining A and B squares to these units using chain piecing, right sides together, with a ¼" seam allowance.


For the faster strip method, cut A and B strips, join into A/B/A and B/A/B units, and cut across the pre-joined strips to create the units needed:


Press all seams toward the dark fabric. Join the B/A/B units to your A/B/A units with butted seams, right sides together, with a ¼" seam allowance. As long as a block has an underlying 3×3 grid, this principle applies.


How to Resize Quilt Blocks
The first step in modifying any quilt block is to decide on your finished block size. You can base this on doubling a pattern, cutting it in half, or working with your available fabric.
Note: When working from a pattern's cutting instructions, remove the seam allowance before scaling. For example, if your pattern calls for 3½″ squares, subtract the seam allowance (½″), double the finished size (3″ → 6″), then add the seam allowance back (½″) — giving you a 6½″ cut piece.
Resizing Square Blocks
Add ½″ to your finished block measurement. For a 4″ finished square, cut a 4½″ square of fabric.
Resizing Rectangular Blocks
Add ½″ to both the length and width. To double a 3″ × 4″ block, cut a 6½″ × 8½″ rectangle.
Resizing Half-Square Triangle Blocks
Add 7/8″ to the desired finished block size. For a 4″ finished HST block, cut 4⅞″ squares.
Resizing Quarter Square Triangle Blocks
Add 1¼″ to the desired finished block size. For a 4″ finished block, cut 5¼″ squares.
0 comments