


New to quilting? Check out our beginner quilting class covering all the basics.
How to Sew a Windmill Quilt Block
The Windmill quilt block is a traditional design using four half-square triangle units in two contrasting colors arranged to create a beautiful spinning windmill effect. It's a versatile pattern that works in a wide variety of quilt designs and is a great block for beginners to learn!
Materials Needed
- Fabric in two contrasting colors
- Rotary cutter and cutting mat
- Quilting ruler
- Sewing machine and thread
- Iron
Step-by-Step Instructions
- Cut four 4½" squares from each color of fabric (eight squares total).
- Take two squares of each color and place them right sides together. Cut each pair diagonally to create eight triangles.
- Take two triangles of contrasting colors and place them right sides together. Sew along the long edge with a ¼" seam allowance. Repeat to make four HST units. Press seams open.
- Take two HST units and place them right sides together with seams nested. Sew along one long edge with a ¼" seam allowance. Repeat with the remaining two units to make two halves. Press seams open.
- Place the two halves right sides together with seams nested. Sew along the long edge with a ¼" seam allowance.
- Press the final seam open. Your Windmill quilt block is complete!
Repeat these steps to make as many Windmill blocks as needed for your project.
No-Bias HST Technique
This technique eliminates the need to directly manipulate the stretchy bias of the triangle. It uses two easy-to-cut squares and produces two HSTs at once.
Step 1: Draw the Diagonal Line
On the back of the lighter fabric, draw a pencil line diagonally from corner to corner.

Step 2: Sew Both Sides of the Line
Stack a pair of light and dark squares right sides together. Sew a ¼" seam allowance on each side of the line.

You will end up with something like this:

Step 3: Cut, Press, and Trim

Press the seam to set it, then press toward the darkest fabric.
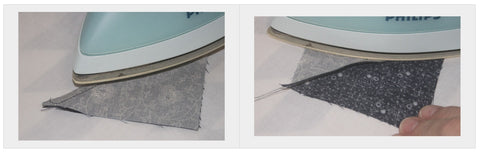
Line up the 45° diagonal angle on your ruler with the seam, then carefully trim with a rotary cutter.


How to Resize Quilt Blocks
The first step in modifying any quilt block is to decide on your finished block size. You can base this on doubling a pattern, cutting it in half, or working with your available fabric.
Note: When working from a pattern's cutting instructions, remove the seam allowance before scaling. For example, if your pattern calls for 3½″ squares, subtract the seam allowance (½″), double the finished size (3″ → 6″), then add the seam allowance back (½″) — giving you a 6½″ cut piece.
Resizing Square Blocks
Add ½″ to your finished block measurement. For a 4″ finished square, cut a 4½″ square of fabric.
Resizing Rectangular Blocks
Add ½″ to both the length and width. To double a 3″ × 4″ block, cut a 6½″ × 8½″ rectangle.
Resizing Half-Square Triangle Blocks
Add 7/8″ to the desired finished block size. For a 4″ finished HST block, cut 4⅞″ squares.
Resizing Quarter Square Triangle Blocks
Add 1¼″ to the desired finished block size. For a 4″ finished block, cut 5¼″ squares.
0 comments