


New to quilting? Check out our beginner quilting class covering all the basics.
How to Sew a Tea Leaf Quilt Block
The Tea Leaf block creates elegant leaf shapes using green fabric rectangles and squares set against a background fabric. It's a beautiful, nature-inspired design that works well in both traditional and modern quilts.
Materials Needed
- Fabric in various shades of green (for the leaves)
- Background fabric
- Sewing machine and thread
- Rotary cutter and cutting mat
- Ruler
- Iron and ironing board
Cutting Guide
- Four 3½" squares of background fabric
- Four 2½" squares of green fabric
- Eight 2" × 3½" rectangles of green fabric
Step-by-Step Instructions
- Lay out all fabric pieces on a flat surface to plan the design. The four background squares form the corners of the block; the green squares and rectangles create the tea leaf shapes.
- Take two 2" × 3½" green rectangles and place them right sides together. Sew along one 3½" side with a ¼" seam allowance. Press the seam open. Repeat with the remaining rectangles to make four pairs.
- Take two pairs of green rectangles and place them right sides together. Sew along the long edge with a ¼" seam allowance. Press the seam open. Repeat to make two sets of four rectangles sewn together.
- Take one green square and place it right sides together with one rectangle set. Sew along one edge with a ¼" seam allowance. Repeat with the other green square and rectangle set. Press the seams open — you now have two tea leaf shapes.
- Arrange the pieces to form the block, placing the tea leaf shapes diagonally across from each other on top of the background squares.
- Place one tea leaf shape right sides together with a background square. Sew along the edge with a ¼" seam allowance. Press the seam open. Repeat with the other tea leaf shape and background square.
- Place the two sewn pieces right sides together, matching the corners of the background squares. Sew along the edges with a ¼" seam allowance.
- Press the completed block flat.
Congratulations! Repeat these steps to make as many Tea Leaf blocks as needed for your quilt project.
Covered Corners Technique
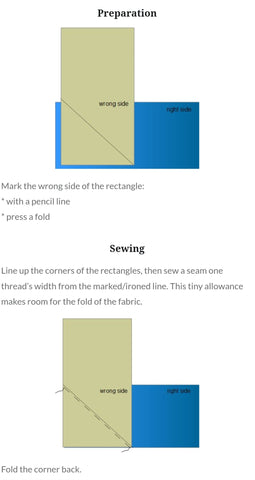
The covered corners technique adds triangle details to your blocks without complex piecing. Follow the steps below:


How to Resize Quilt Blocks
The first step in modifying any quilt block is to decide on your finished block size. You can base this on doubling a pattern, cutting it in half, or working with your available fabric.
Note: When working from a pattern's cutting instructions, remove the seam allowance before scaling. For example, if your pattern calls for 3½″ squares, subtract the seam allowance (½″), double the finished size (3″ → 6″), then add the seam allowance back (½″) — giving you a 6½″ cut piece.
Resizing Square Blocks
Add ½″ to your finished block measurement. For a 4″ finished square, cut a 4½″ square of fabric.
Resizing Rectangular Blocks
Add ½″ to both the length and width. To double a 3″ × 4″ block, cut a 6½″ × 8½″ rectangle.
Resizing Half-Square Triangle Blocks
Add 7/8″ to the desired finished block size. For a 4″ finished HST block, cut 4⅞″ squares.
Resizing Quarter Square Triangle Blocks
Add 1¼″ to the desired finished block size. For a 4″ finished block, cut 5¼″ squares.
0 comments