


New to quilting? Check out our beginner quilting class covering all the basics.

How to Sew an Eccentric Star Quilt Block
The Eccentric Star quilt block is a striking star design built from half-square triangle units arranged to create an asymmetric, modern star effect with bold visual impact. It's a wonderful block for quilters who love a contemporary twist on a classic star pattern!
How to Make the Block
This block is built from half-square triangle (HST) units. Make your HSTs using the no-bias technique below, then arrange them in the Eccentric Star pattern — rotating and positioning the units so the star points emerge from the diagonal lines, creating the asymmetric star effect shown in the block photos above.
No-Bias HST Technique
This technique eliminates the need to directly manipulate the stretchy bias of the triangle. It uses two easy-to-cut squares and produces two HSTs at once.
Step 1: Draw the Diagonal Line
On the back of the lighter fabric, draw a pencil line diagonally from corner to corner.

Step 2: Sew Both Sides of the Line
Stack a pair of light and dark squares right sides together. Sew a ¼" seam on each side of the line.

You will end up with something like this:

Step 3: Cut Along the Diagonal Line

Step 4: Press the Seams
Press the seam to set it, then press toward the darkest fabric.
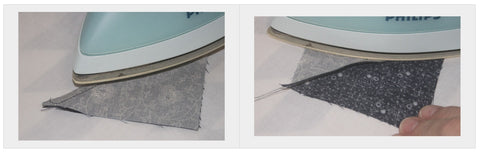
Step 5: Trim to Size
Line up the 45° diagonal angle on your ruler with the seam, then carefully trim with a rotary cutter.


How to Resize Quilt Blocks
The first step in modifying any quilt block is to decide on your finished block size. You can base this on doubling a pattern, cutting it in half, or working with your available fabric.
Note: When working from a pattern's cutting instructions, remove the seam allowance before scaling. For example, if your pattern calls for 3½″ squares, subtract the seam allowance (½″), double the finished size (3″ → 6″), then add the seam allowance back (½″) — giving you a 6½″ cut piece.
Resizing Square Blocks
Add ½″ to your finished block measurement. For a 4″ finished square, cut a 4½″ square of fabric.
Resizing Rectangular Blocks
Add ½″ to both the length and width. To double a 3″ × 4″ block, cut a 6½″ × 8½″ rectangle.
Resizing Half-Square Triangle Blocks
Add 7/8″ to the desired finished block size. For a 4″ finished HST block, cut 4⅞″ squares.
Resizing Quarter Square Triangle Blocks
Add 1¼″ to the desired finished block size. For a 4″ finished block, cut 5¼″ squares.
Комментариев: 0