


New to quilting? Check out our beginner quilting class covering all the basics.
How to Sew a Pinwheel Quilt Block
The Pinwheel quilt block is a fun and eye-catching design built from four half-square triangles arranged to create a spinning pinwheel effect. It's a great way to showcase two contrasting fabrics!
Step-by-Step Instructions
- Cut your fabric. You will need four squares, two of each color. For a 6" finished block, cut four 7" squares (to allow for seam allowances).
- Mark your squares. On the wrong side of two squares, draw a diagonal line from one corner to the opposite corner.
- Sew the squares together. Place two squares right sides together with the marked lines matching. Sew a ¼" seam on each side of the marked line.
- Cut apart. Cut along the marked line to create two HST units. Press seams open. Repeat with the other two squares to make four HSTs total.
- Arrange the pinwheel. Arrange the four HSTs so the same colors meet in the center and opposite colors touch on the outside edges, creating the pinwheel effect.
- Sew the block together. Sew the top two HSTs together, then the bottom two. Join the two halves, carefully matching the center seams. Press seams open.
- Trim. Trim the block to your desired finished size, keeping the center seams straight.
Congratulations — your Pinwheel quilt block is complete! Repeat these steps to make as many blocks as needed for your quilt.
Half-Square Triangle (HST) Technique
This technique eliminates the need to directly manipulate the stretchy bias of the triangle. It uses two easy-to-cut squares and produces two HSTs at once.
Step 1: Draw the Diagonal Line
On the back of the lighter fabric, draw a pencil line diagonally from corner to corner.

Step 2: Sew Both Sides of the Line
Stack a pair of light and dark squares right sides together. Sew a ¼" seam allowance on each side of the line.

You will end up with something like this:

Step 3: Cut, Press, and Trim

Press the seam to set it, then press toward the darkest fabric.
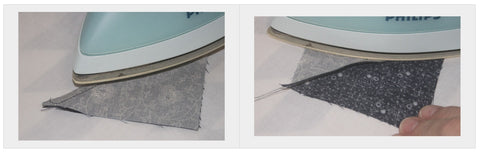
Line up the 45° diagonal angle on your ruler with the seam, then carefully trim with a rotary cutter.


Corner Square Technique
Use this technique to add precise corner triangles to any block unit.
Sew the squares together.

Mark the wrong side of the unit with a pencil line, aligning the corners of the squares and the intersection of the seams.

Line up the corner of the square or triangle you will add to the corner of the unit.

Sew a seam one thread's width from the marked line — this tiny allowance makes room for the fold of the fabric so the triangle point isn't cut off. Fold the triangle into position using the squares to assist alignment, then press.

Trim away excess fabric to reduce bulk, leaving a ¼" seam allowance and trimming the ears.

Nine Patch Technique
The secret to a perfect nine patch is pressing seams so they butt together neatly when joined.
- Cut 5 A squares and 4 B squares. Using chain piecing, join a B square to 3 of the A squares, right sides together, with a ¼" seam allowance.

- Join the remaining A and B squares to these units using chain piecing, right sides together, with a ¼" seam allowance.


For the faster strip method, cut A and B strips, join into A/B/A and B/A/B units, and cut across the pre-joined strips to create the units needed:


Press all seams toward the dark fabric. Join the B/A/B units to your A/B/A units with butted seams, right sides together, with a ¼" seam allowance.


How to Resize Quilt Blocks
The first step in modifying any quilt block is to decide on your finished block size. You can base this on doubling a pattern, cutting it in half, or working with your available fabric.
Note: When working from a pattern's cutting instructions, remove the seam allowance before scaling. For example, if your pattern calls for 3½″ squares, subtract the seam allowance (½″), double the finished size (3″ → 6″), then add the seam allowance back (½″) — giving you a 6½″ cut piece.
Resizing Square Blocks
Add ½″ to your finished block measurement. For a 4″ finished square, cut a 4½″ square of fabric.
Resizing Rectangular Blocks
Add ½″ to both the length and width. To double a 3″ × 4″ block, cut a 6½″ × 8½″ rectangle.
Resizing Half-Square Triangle Blocks
Add 7/8″ to the desired finished block size. For a 4″ finished HST block, cut 4⅞″ squares.
Resizing Quarter Square Triangle Blocks
Add 1¼″ to the desired finished block size. For a 4″ finished block, cut 5¼″ squares.
Комментариев: 0